

This blog is for sharing my artwork, my experiments with fabric and paper, and mixed media explorations~~~ Please join me on this journey.
Showing posts with label molding paste. Show all posts
Showing posts with label molding paste. Show all posts
Saturday, November 12, 2016
Sunday, October 5, 2014
Textures on Newspaper pages
I was playing with a variety of textures on torn strips of newspaper. After
tearing the sheets freehand, I glued two pieces together to make the pages more
sturdy, but not the same height. I then proceeded to paint, spritz, and apply
molding paste through stencils onto the pages. I also did some stamping.
I then folded them in half and placed them inside a leather cover, and
stitched just one signature.
The brass clasp is from the hardware store....just love going there for
supplies!
 |
| The Cover |
~~~~ and a selection of the pages:


Please click on image for an enlarged view
Monday, June 23, 2014
Molding Paste on Vinyl

I cut out a tag shape from clear vinyl, and pushed molding
paste through a stencil (from a produce bag) onto it. I rubbed out the paste in three spots then
sprayed it with blue. I also cut the same tag shape from text cardstock and
glued it behind the vinyl tag. I then glued the tag to my journal page. I did
some stamping and spraying. The black and white dots are strips of fabric from a sewing project.
Please click on image for an enlarged view
Tuesday, April 22, 2014
Dance the Night Away
Here is my journal entry for today. Molding paste through a couple of stencils, then Inka Gold rubbed on for instant waxy sheen. Background with watercolours. The image is from an old soap ad. (1920's magazine)

Please click on image for an enlarged view
Please click on image for an enlarged view
Wednesday, July 31, 2013
Bird Language
The birds are under a layer of serviette tissue, with molding paste pushed through letter stencils.
I just cannot get enough of stencils - they come in so many patterns, and you can make them yourself out of plastic and a burning tool. These letter stencils are heavy paper ones from the Office supply store. Lots of spraying with mists done here as well. I am drawn to those as well...sigh.

Please click on image for an enlarged view
I just cannot get enough of stencils - they come in so many patterns, and you can make them yourself out of plastic and a burning tool. These letter stencils are heavy paper ones from the Office supply store. Lots of spraying with mists done here as well. I am drawn to those as well...sigh.
Please click on image for an enlarged view
Tuesday, May 7, 2013
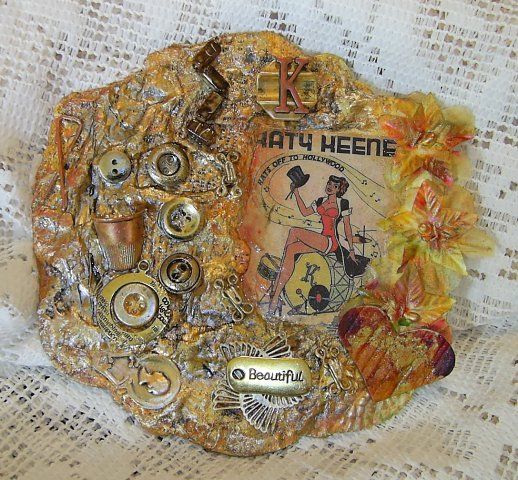
More Katy Keene book pages
I am thoroughly enjoying playing with molding pastes and other caulking products to produce texture on these pages.
Here is page 3 of my Katy Keene book, the Gold page.
You can find the first two pages here:
http://sewinart.blogspot.ca/2013/03/chipboard-book-pages.html
I started with sewing tissue crumpled up and glued down. The process is the same as with the first two pages. After glueing down the image, I use Diamond Glaze or Clear Tar Gel by Golden to prevent the image from color spray damage. (I use a variety of colors of spray, mostly muted shades.)
I am currently picking out embellies for my next page!

Please click on image for an enlarged view
Here is page 3 of my Katy Keene book, the Gold page.
You can find the first two pages here:
http://sewinart.blogspot.ca/2013/03/chipboard-book-pages.html
I started with sewing tissue crumpled up and glued down. The process is the same as with the first two pages. After glueing down the image, I use Diamond Glaze or Clear Tar Gel by Golden to prevent the image from color spray damage. (I use a variety of colors of spray, mostly muted shades.)
I am currently picking out embellies for my next page!
Please click on image for an enlarged view
Wednesday, February 27, 2013
Send a Smile
I have added some finishing touches to my mixed media backgroung page that I posted here:
http://sewinart.blogspot.ca/2013/01/mixed-media-background-page.html
Here is the final page:

Please click on image for an enlarged view
http://sewinart.blogspot.ca/2013/01/mixed-media-background-page.html
Here is the final page:

I added a quote stamp from Quietfire Design, "A Smile that you send out returns to you", and some other elements. A very simple page.
Please click on image for an enlarged view
Saturday, August 11, 2012
LIVE Fabric Book
I jut finished making pages for a fabric book, which I will soon be binding.
Some of the background fabrics are dropcloths for my painting....mostly canvas.
I further embellished the fabric sheets, with painting, stitching, and addional fabrics, dryer sheets, art- used baby wipes, laces, molding pastes and more. Layers and layers.
Some pages were felted, then free-motion stitched.

Chiffons and cottons are layered and stitched.


Also a piece of a glittery gold and black doily.
Please click on image for an enlarged view
Monday, July 16, 2012
Plaster gauze journal cover
Here I altered the cover of this purchased journal, again using molding paste and caulking. Then Lumieres. There is also some round pieces of cardboard under the paste, as well as Plaster gauze. I love playing with these products!

Please click on image for an enlarged view

Please click on image for an enlarged view
Handmade books
Here are two small books I made using caulking and paints for the covers. The butterfly is a chipboard piece. I went through my stash of papers and cards which I used for doing samples, techniques, and experiments and came up with quite a bit that I could use for the pages in these two journals. They were fun to make:


Please click on image for an enlarged view


Please click on image for an enlarged view
Friday, October 8, 2010
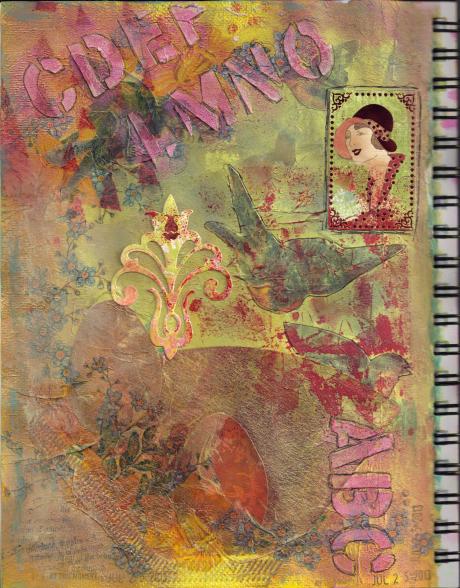
Art Journal Gypsies Cover
This is the cover I made for my AJG Journal. It started with some molding paste, then colored with inks and acrylics. When dry I splotched on some Glass Bead gel from Golden products. I colored some places with alcohol inks. The plaque is made from air-dry clay, rolled thin and pressed over a carved jewelry box of mine, to get the bird image, then painted with H2O's. The oval glass over its face is also covered with glass bead gel. The flourish is Tim Holtz grungeboard. Oh yes! - this cover was a lot of fun to play with!
 Please click on image for an enlarged view

Saturday, May 8, 2010
ENJOY LAUGHTER EVERY DAY
Here is another spread in Juliet's journal
The left page is stencil work done with Golden's molding paste and sequin waste, then colored with dye inks. The scroll stencil is done with embossing ink and powders. Blue stamped image is harlequin and text.

PLEASE CLICK ON IMAGE FOR AN ENLARGED VIEW
The left page is stencil work done with Golden's molding paste and sequin waste, then colored with dye inks. The scroll stencil is done with embossing ink and powders. Blue stamped image is harlequin and text.

PLEASE CLICK ON IMAGE FOR AN ENLARGED VIEW
Subscribe to:
Posts (Atom)